In the part 1, we discovered how to set up a chatbot with Chatfuel and how to feed it with data from Firebase. In this part we’ll add some memory to your chatbot by using the storage capability of Firebase.
Store the user answer
You might have notice that the chatbot is pretty dumb for the moment. Indeed, it only displays the questions but do not care about the answers. We’ll now save each answer for a later usage.
Design the data model
Firebase organizes the data in a unique model tree. You can think of it as the folders on your filesystem. The data can be either a key-value pair, a map of key-value pairs or an array of values. As for the values, they have the following types: string, number or boolean.
Let’s organize our model tree like that:
/
|
+ sixfactors
   |
   + answers
      |
      + <user id 1>
      |  |
      |  +- "lastQuestionId": 2
      |  +- "0": 3
      |  +- "1": -3
      |  +- "2": 3
      |
      + <user id 2>
      |
      ...
The answer of a given user is accessible through the reference /sixfactors/answers/<userId>. An answer code is stored along to each question id. The lastQuestionId enables the user to come back and restarts where he stopped before.
Create a new function that stores the answer
Let’s create a new function in the file index.js in our Firebase project that stores the user answer after each question. Initialize the database access at the top of the script:
const admin = require('firebase-admin');

admin.initializeApp(functions.config().firebase);
The function sixfactorsSaveAnswer gets 4 parameters which are the user id within chatfuel, the current language of the user, the question id to answer to and the actual user answer.
As you’ll see later, Chatfuel send the text of the answer and not an answer code so depending of the user language the answer text might change. For instance, I agree in english shall be equal to J’approuve in french. The utility function getAnswerCode maps a localized answer to an answer code.
const lang = getLang(locale);

const answerCode = getAnswerCode(lang, userAnswer);
The answer is handled by a javascript map that links the question id to the answer code. The last question id that has been answered to is also saved as a number.
var answer = {};
answer["lastQuestionId"] = parseInt(questionId, 10);
answer[questionId] = answerCode;
Once the database access is initialized, the function can perform database actions. The following line navigates through the data tree to /sixfactors/answers and select a data branch child with a user id:
const userAnswersRef = admin.database().ref('/sixfactors/answers').child(userId);
With this reference, it is possible to append a new answer into the model tree:
userAnswersRef.update(answer)
  .then(function() {
  response.end();
  });
The actions performed on the database are asynchronous so it is necessary to give the update method a callback function when the operation has completed. See, the reference API documentation for more details. Here, we answer the caller that the request has succeeded.
For clarity, the error handling has been removed but you should also handle the event when the database sends errors.
You can find the source code of this new function here.
Troubleshoot your code
When developing your own function, you might encounter some issues. Fortunately, it is possible to see the server errors on your Firebase console or into a terminal thanks to the command firebase functions:log.
$ firebase functions:log

2017-07-25T09:45:33.566793793Z D sixfactorsSaveAnswer: Function execution started
2017-07-25T09:45:33.566831995Z D sixfactorsSaveAnswer: Billing account not configured. External network is not accessible and quotas are severely limited. Configure billing account to remove these restrictions
2017-07-25T09:45:34.116Z I sixfactorsSaveAnswer: sixfactorsSetAnswer : {"chatfuel user id":"1","locale":"fr_FR","questionId":"0","userAnswer":"I agree"}
2017-07-25T09:45:34.126Z E sixfactorsSaveAnswer: ReferenceError: getAnswerCode is not defined
    at exports.sixfactorsSaveAnswer.functions.https.onRequest (/user_code/index.js:111:22)
    at cloudFunction (/user_code/node_modules/firebase-functions/lib/providers/https.js:26:47)
    at /var/tmp/worker/worker.js:653:7
    at /var/tmp/worker/worker.js:637:9
    at _combinedTickCallback (internal/process/next_tick.js:73:7)
    at process._tickDomainCallback (internal/process/next_tick.js:128:9)
Additionally, you can add your own debug message with the following javascript code:
console.log("Print some debug information here.");
This message will be outputed into the function logs.
To test your function outside of Chatfuel, you can use the command line command curl like this:
curl -v -X POST -d "chatfuel%20user%20id=1&locale=en_US&questionId=0&userAnswer=I%20agree" https://us-central1-sixfactors-3ae56.cloudfunctions.net/sixfactorsSaveAnswer
Note that the spaces are replaced by the special code %20.
Integrate this new function to Chatfuel
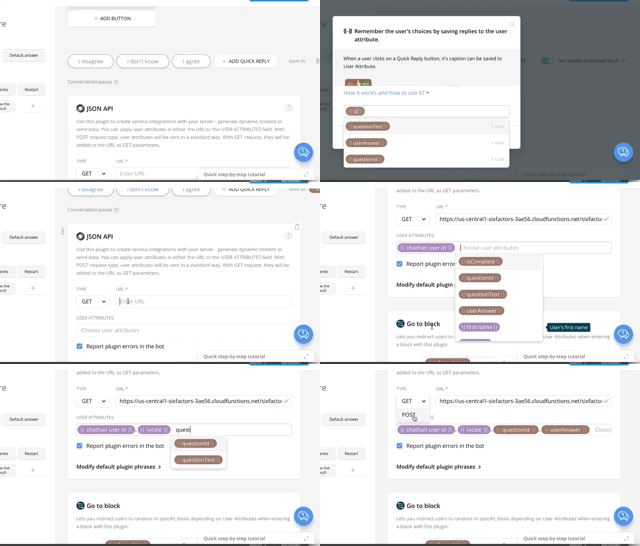
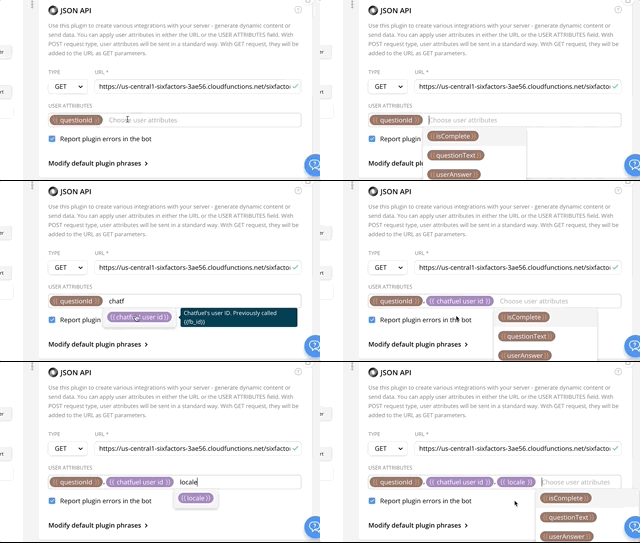
We will add a new JSON API step after the Quick Reply step in the block Ask a question. The user attribute userAnswer stores the Quick Reply answer. The JSON API step can then take user attributes as parameters : chatfuel user id, locale, questionId, userAnswer. As we are updating the database, we will use the HTTP Method POST instead of GET. That way, the request parameters will be available in the request.body and not in the request.query.

Import the six factors questions into the Firebase database
One can handle a set of few questions pretty easily but when it comes to manage a set of 60 questions in different languages, it is better to handle this differently. Node.js can load static files into objects. We’ll use this capacity to handle the localization of these 60 questions.
First, we create a JSON file where we’ll include the questions set. Check the content of the data file here.
Then, we can use the requirefunction to load the content of this file into a constant object.
const sixfactors = require('./data/sixfactors');
Fetch the question label from the metadata
Now that we have loaded the metadata for our set of questions, we can modify the API function sixfactorsGetNextQuestion.
As you can see, we added some localized label in the dataset so we need to give the locale user attribute to this function to know which label to return.
// Grab the locale parameter.
const locale = request.query["locale"];

// ...

if( !verifyParam(locale) ) {
  badRequest(response, "Unable to find the user locale.");
  return;
}

const lang = getLang(locale);
We also pass the chatfuel user id to the function in order to get the last question id answered by the user.
// Grab the chatfuel user ID parameter.
const userId     = request.body["chatfuel user id"];

// ...

if( !verifyParam(userId) ) {
  badRequest(response, "Unable to find the user id.");
  return;
}
This function might load the last question id from the database which is done asynchronously:
- Check if the parameter questionId is properly set
- (async) If not, get the lastQuestionId for this user
- Increment to the next question id
- Fetch for the question label
- If the next question doesn’t exist, ends the test
- Create the HTTP response
Javascript uses promises to handle asynchronicity:
// Get the last question id for this user if the parameter is not valid
var lastQuestionIndex = parseInt(lastQuestionId, 10);
var promise;

if( isNaN(lastQuestionIndex) ) {
  promise = __retrieveLastQuestionId(userId)
} else {
  promise = new Promise( (resolve, reject) => {
    resolve(lastQuestionIndex);
  } );
}

promise
  .then(__incrementQuestionId)
  .then(__fetchQuestion).catch(__endOfTest)
  .then(__createResponse);
The noticeable part here is the way the last question id is loaded from the database:
const lastQuestionRef = admin.database().ref('/sixfactors/answers').child(userId).child("lastQuestionId");

return lastQuestionRef.once("value")
.then( (dataSnapshot) => {

  if( !dataSnapshot.exists() ) {
    return -1;
  }

  return dataSnapshot.val();

} );
You can retrieve the code of this section here.
Update the new function signature in Chatfuel
The function sixfactorsGetNextQuestion takes two new parameters : chatfuel user id and locale. We’ll update Chatfuel to take this modification into account.

Compute the result of the test
The six factors test does a projection of the user answers on 6 axis: casualness, independence, toughness, creativity, energy and controlling.
Each question contributes on one axis positively or negatively. The result of the test will display the score of the user on each axis.
To compute the result we will update the metadata. For each question, we’ll associate one axis and the range of user answer codes where this answer contributes positively on the axis.
/
|
+ questions
   |
   + "0"
   |  |
   |  + label
   |  |  |
   |  |  +- ...
   |  + matches
   |     |
   |     +- dimension: "casualness"
   |     +- range: [ 2, 3]
   |
   + ...
+ dimensions
   |
   + "casualness"
   |  |
   |  + label
   |     |
   |     +- "en": "Casualness"
   |     +- "fr": "Décontraction"
   |  + scale
   |     |
   |     + low
   |     |  |
   |     |  + label
   |     |     |
   |     |     +- "en": "Cautious"
   |     |     +- "fr": "Précautionneux"
   |     + high
   |       |
   |        + label
   |           |
   |           +- "en": "Impulsive"
   |           +- "fr": "Impulsif"
   + ...
You can find the metadata file here.
Then, we create a new API function called sixfactorsComputeTestResult where we’ll do the user answer analysis. This function takes the user id and the user locale in parameter.
Nothing new for this function so you can find the code directly here.
The function returns Chatfuel user attributes for each axis with a text associated:
response.json( {
    "set_attributes":
    {
      "orgCasualnessDesc":    analysis["organization"]["casualness"].description[lang],
      "orgToughnessDesc":     analysis["organization"]["toughness"].description[lang],
      "intIndependenceDesc":  analysis["interaction"]["independence"].description[lang],
      "intControllingDesc":   analysis["interaction"]["controlling"].description[lang],
      "entEnergyDesc":        analysis["enthusiasm"]["energy"].description[lang],
      "entCreativityDesc":    analysis["enthusiasm"]["creativity"].description[lang],
    }
  } );
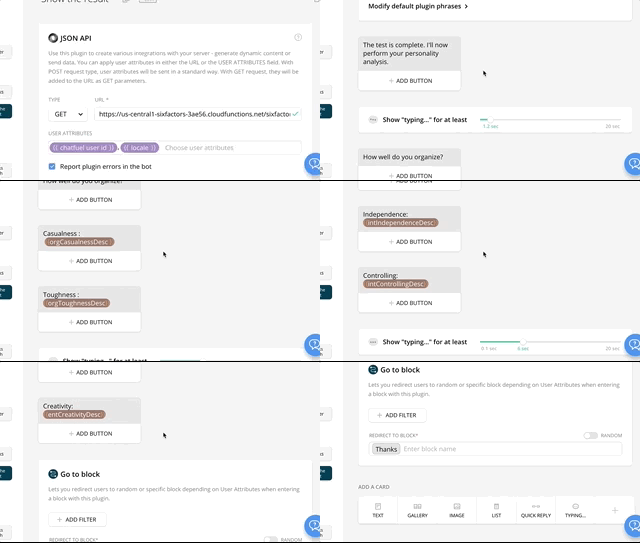
We use those user attributes to build the personality analysis in Chatfuel. In the block Show the result, we display the analysis for each axis. We can add some temporization with the step Typing… to let the user read the text.

Protect the API with a key
The API functions are opened to anybody. Indeed, we want any user to perform the test without logging in. However, we don’t want anybody to use our API outside of the chatbot. For this purpose, we add an API key that we inject during the deployment of the functions:
firebase functions:config:set sixfactors.apikey=9PKc3FruiCfmhd
✔  Functions config updated.

Please deploy your functions for the change to take effect by running firebase deploy --only functions
Then, we modify the code to retrieve this API key at runtime:
/*
Get the injected API key
*/
const API_KEY = functions.config().sixfactors.apikey
and we test the API key before executing any API function:
exports.sixfactorsGetNextQuestion = functions.https.onRequest((request, response) => {

  console.log("sixfactorsGetNextQuestion : " + JSON.stringify(request.query) );

  if( !checkApiKey(request) ) {
    badRequest(response, "The API key is not valid.");
    return;
  }

  //...
with the following utility function:
/*
  Check the API key
*/
function checkApiKey(request) {

  let apiKey = request.query.apikey;

  if ( apiKey === undefined ) {
    apiKey = request.body.apikey;
  }

  return (API_KEY === apiKey);

}
Finally, we redeploy the functions and their configuration:
$ firebase deploy --only functions

=== Deploying to 'sixfactors-3ae56'...

i  deploying functions
i  functions: ensuring necessary APIs are enabled...
i  runtimeconfig: ensuring necessary APIs are enabled...
✔  functions: all necessary APIs are enabled
✔  runtimeconfig: all necessary APIs are enabled
i  functions: preparing functions directory for uploading...
i  functions: packaged functions (14.21 KB) for uploading
✔  functions: functions folder uploaded successfully
i  starting release process (may take several minutes)...
i  functions: updating function sixfactorsGetNextQuestion...
i  functions: updating function sixfactorsSaveAnswer...
i  functions: updating function sixfactorsComputeTestResult...
✔  functions[sixfactorsGetNextQuestion]: Successful update operation.
✔  functions[sixfactorsSaveAnswer]: Successful update operation.
✔  functions[sixfactorsComputeTestResult]: Successful update operation.
✔  functions: all functions deployed successfully!
To finish, we set a new user attributes in the block Welcome message:
apikey=9PKc3FruiCfmhd
and we inject this user attribute apikey in each JSON API step as a parameter in the blocks Ask a question and Show the result.
Conclusion
In this part, we’d discovered how to save data into Firebase for later use. We’d also shown how to load a static data file at runtime and how to troubleshoot our code. Finally, we’d propected our API with a simple security key. You can access to the complete code here and you can test the chatbot created for this tutorial here. As an exercise, I’ll let you try to support a second language in your chatbot.
You are now ready to develop your own chatbot so let your imagination go wild! Give me your experience of building a chatbot in the comment below.