There is a good chance that you have already faced a chatbot at least once. They are all over the place, used for user support, inbound marketing, games… This is a whole new ground for UX designers to get the users involved in their product. You might think that it can be a good fit for your new project as well but you don’t know how to make a chatbot. Indeed, the chatbots are a good option to make an engaging Minimum Viable Product. This tutorial targets people who want to test a new product without much programming skills beside of some javascript.
Background
A chatbot is a service that uses an instant messenger like Facebook Messenger, WhatsApp, Skype or Slack as its prefered way to communicate to the end-user. It can be used as a complement to a website that presents the product features. The user can interact with the chatbot by using natural language or through prebuilt messages.
Chatfuel is a chatbot managing system which handles the logic of the conversation with the end-user. Chatfuel works uniquely with Facebook Messenger. It can define the flow of a conversation, generate semi-random answers and learn how to answer when the user changed a little its input. Chatfuel can also integrate with thirdparty services to insert dynamic content and it can be extended by fetching data from a custom backend service through a JSON API. Chatfuel is free to use.
Firebase is a document-based datastore that handles data as JSON object. It is often used on frontend website to set up a website with a simple backend but without the administration hassles. Recently, Firebase added the possibility to create backend functions that can react to a database event or an HTTP request. Then, it is now possible to build a whole backend for your chatbot with Firebase only. Firebase is free to use for small data and traffic and it restricts access to thirdparty APIs from the backend functions.
Prepare your conversation flow
First, you need to know what you want to ask to the end-user. For this tutorial, I am asking the end-user to perform a personality test called Six factors. I start by asking him if it is OK to do the test and I explain the instructions for the test, then I loop on the questions and present prebuilt answers, finally I display the result and I thanks the user for its time.
You can represent the conservation by a flow chart. For this example, it can be represented like this:
(Welcome message)-------------------+
|                                   |
| Ok, let's go!                     | No, thanks
|                                   |
(Display the instructions)          (Thank the user)
|
+ <-----------------------+
|                         |
(Ask a question)          |
|                         | No
<Is the test complete ?>  |
|              \          |
| Yes           `---------+
|
(Show the result)
|
(Thank the user)
There are also some commands that interupts the conservation flow:
|||
 |--Restart, please! : reset the previous answers and returns to the Welcome Message
 |--Bye. : stop the question loop and thank the user
Note that for this tutorial, I used an old project and I didn’t work much on the user experience. In a chatbot, it is preferable to limit the number of questions to 3 to 5. 60 questions is far too much, yet I need them to get a representative personality test. This test does a projection of one’s personality on 6 axis and it requires some redundancy to avoid biasis. You can imagine a layer of gamification to involve the user until the end but it is better to limit your interaction with the user to the strict minimum. For more information on designing a chatbot, have a look on this list of articles.
Design your conversation flow in Chatfuel
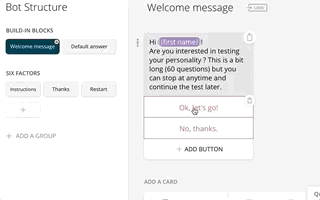
Chatfuel represents each step of the conversation by a block where you can ask a question, collect the answer and perform the next action. You can imagine having several conversation flows inside your chatbot. The groups are the way to put blocks together. For this tutorial, I created a group called Six factors and I added all my blocks that concern the personality test inside.
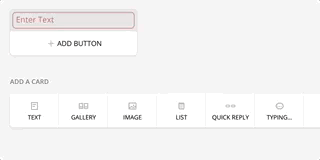
Build the interaction blocks
The block Welcome message is the first block executed by the chatbot when the user starts a conversation with it. First, change the welcome message for your service. I create the two action buttons OK, let’s go! and No, thanks.
For the first block of the test, I will display the instructions of the test in a block called Instructions. Create a text block and add the following instructions:
“I’ll show you questions and you’ll tell me if you agree or disagree.”
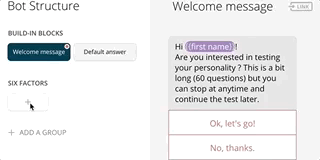
Let’s create two other blocks when the user leaves the test called Thanks and he restarts the conversation called Restart.
Then, link the block Instructions to the action button OK, let’s go! inside of the Welcome message block. Do the same with the action button No, thanks. to the block Thanks.
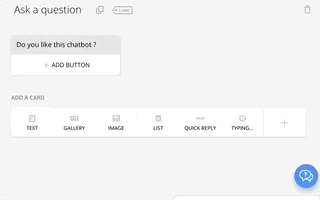
Then, let’s create another block called Ask a question and create a Go to block step into the block Instructions that goes to the block Ask a question. Add the following steps to the block Ask a question:
- Add a Text step and display the text of a question. For the moment, the question text is not dynamic and we can only display the first question.
- Add a Quick reply step and set the following answer I disagree, I don’t know, I agree. Put the answer in the user attribute userAnswer
- Add a Go to block step and loop back to the block Ask a question.
Back to the block Instructions, add a Go to block step to the block Ask a question.
You can test your chatbot from the chatfuel dashboard by clicking on the button Test this chatbot. You’ll be redirected to your Messenger account where your chatbot will start to speack to you!
Add the interruption commands
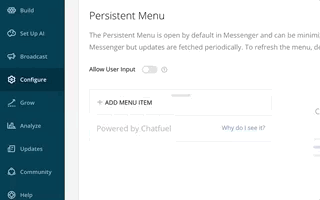
Let’s also add the action commands that can interrupt the conversion flow. Navigate on the tab Configure of the right panel where you’ll be able to add actions in a persistent menu. On messenger, this persistent menu is located on the left side of the message input bar. Let’s add the following actions:
- Restart, please. : Go to the block Restart
- Bye. : Go to the block Thanks
You now have an infinite conversation where your chatbot ask the same question to the user. Not really useful… Chatfuel can collect dynamic content through a JSON API. We’re going to create a small backend service to serve this dynamic content to Chatfuel.
Create a simple backend service with Firebase
Firebase is a database that stores JSON objects. However, they recently added a feature to have functions run on their infrastructure (they’re actually using the Google Cloud Functions). It is what we need to get a backend service without having to spawn our own server. You can find the source of this tutorial here.
Initialize your Firebase project
First, register on Firebase here and create a new project called sixfactors.
The Cloud Functions of Firebase are running on Node.js so you’ll need first to install the Node.js Package Manager (NPM) on your system. You can get NPM here.
Once you installed NPM on your system, you can install the firebase-tools:
npm install firebase-tools
Create a workspace folder for your project and login to Firebase :
mkdir sixfactors
cd sixfactors
firebase login
Then, init your project:
firebase init functions
Select the project sixfactors and set the NPM dependancies to Y.

Firebase will create a new project and initialize your project with an helloWorld function. The workspace is structured as following:
- .firebaserc : set the project information
- firebase.json : set the project configuration
- functions :
- index.js : entrypoint for all the Cloud Functions
- node_modules : contains the Node.js dependancies
- package.json : define the Node.js dependancies
Deploy the example
Open the file functions/index.js in a text editor (eg. Sublime Text or Atom) and uncomment the function helloWorld:
// exports.helloWorld = functions.https.onRequest((request, response) => {
//   response.send("Hello from Firebase!");
// });
exports.helloWorld = functions.https.onRequest((request, response) => {
  response.send("Hello from Firebase!");
});
You can deploy this example with the following command:
firebase deploy


=== Deploying to 'sixfactors-3ae56'...

i  deploying functions
i  functions: ensuring necessary APIs are enabled...
i  runtimeconfig: ensuring necessary APIs are enabled...
✔  runtimeconfig: all necessary APIs are enabled
✔  functions: all necessary APIs are enabled
i  functions: preparing functions directory for uploading...
i  functions: packaged functions (860 B) for uploading
✔  functions: functions folder uploaded successfully
i  starting release process (may take several minutes)...
i  functions: creating function helloWorld...
✔  functions[helloWorld]: Successful create operation.
✔  functions: all functions deployed successfully!

✔  Deploy complete!

Project Console: https://console.firebase.google.com/project/sixfactors-3ae56/overview
Function URL (helloWorld): https://us-central1-sixfactors-3ae56.cloudfunctions.net/helloWorld
In the output of the command, the URL of your API is displayed at the end:
https://us-central1-sixfactors-3ae56.cloudfunctions.net/helloWorld
If you display this URL in your browser, you should see the following message :
Hello from Firebase!
Adapt the example for Chatfuel
For the moment, this API is not really useful for Chatfuel. Chatfuel expects JSON object with a specific semantic. In the file function/index.js, change the following line:
response.send("Hello from Firebase!");
response.json({ "messages": [ { "text": "Hello from Firebase!" } ] });
Then, redeploy the function:
firebase deploy
Connect Chatfuel to your backend service
Now that you create a simple JSON API let’s use it in Chatfuel.
Plug in your backend service into your Chatfuel conversation
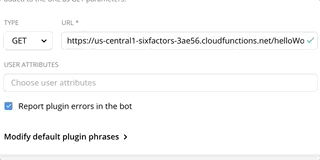
Go to your Chatfuel dashboard and navigate on the tab Build. Select your block *Ask a question** and add a JSON API step that you can find in the plugins catalog. Set up the plugin with your URL you got when you deployed your function (eg. us-central1-sixfactors-3ae56.cloudfunctions.net/helloWorld). Then, move this step at the beginning of the block and test your chatbot in messenger by clicking on the menu action Restart, please. to restart the conversation.
The chatbot shall display the message Hello from firebase! just after the instructions and before the question. Congratulations! You connected your backend service to Chatfuel :-)
Create a new function that returns the next question
As for now, your chatbot conversation doesn’t go anywhere. We’ll create a new function that takes the current questionId in parameter and returns the next question to Chatfuel. For this, we’ll use the user attributes of Chatfuel. The user attributes are variables that can store some information during the conversation. As you have notice in the previous example, the JSON API can display directly a message in Chatfuel. However, as a design principle, we’ll prefer to use the backend service to update the user attributes and use the Chatfuel UI to build the conversation logic.
The new function is called sixfactorsGetNextQuestion. It has the following behavior:
- If the parameter questionId is not set, the function shall return the question at index 0 in the question list.
- If the parameter questionId is set, the function shall return the question at the index questionId + 1
- If the next questionId overflows the number of available question, the function shall return that the test is complete.
- The following user attributes shall be updated each time the function is called :
- questionId: the next question index in the question list
- questionText: the text of question to display
- isComplete: true if the test is complete, false otherwise
For now, I didn’t used the Firebase datastore for simplification. The code of the functions look like this:
const questions = [
	"Do you take initiatives?",
	"Do you take care of people?",
	"Do you prefer to be alone?",
	"Do you prefer to listen than to talk?",
	"Do you feel rarely tired?"
]

exports.sixfactorsGetNextQuestion = functions.https.onRequest((request, response) => {

  console.log("sixfactorsGetNextQuestion : " + JSON.stringify(request.query) );

  // Grab the questionId parameter.
  const questionId = request.query["questionId"];
  // Parse the parameter as an integer
  var questionIndex = parseInt(questionId, 10);

  // Set 0 if it is not a number or increment the question index
  if( isNaN(questionIndex) ) {
  	questionIndex = 0;
  } else {
  	questionIndex++;
  }


  if( questionIndex >= 0 && questionIndex < questions.length ) {

  	response.json( {
		"set_attributes":
		{
			"isComplete": false,
			"questionId": questionIndex,
			"questionText": questions[ questionIndex ],
		}
	});

  } else {

  	response.json( {
		"set_attributes":
		{
			"isComplete": true,
			"questionId": questions.length,
			"questionText": "",
		}
	});

  }


});
You can deploy this new function:
firebase deploy
Configure the chatbot to display the question text
First, let’s create a block Show the result with a Text step : > The test is complete Add an additional Go to block step to the block Thanks.
In the block Ask a question, change the URL of the JSON API to call this function: > https://us-central1-sixfactors-3ae56.cloudfunctions.net/sixfactorsGetNextQuestion
The function can take the parameter questionId in input and it will increment questionId in output at each call. (Note: there is a bug in Chatfuel where you can’t require a parameter that don’t exist yet, try to run the chatbot without input parameter once so Chatfuel will discover the new parameter in the output of JSON API then add the input parameter again in the JSON API step).
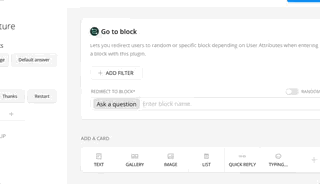
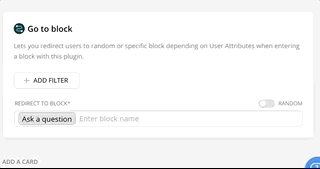
At the end of the block, we will branch the next block depending on the isComplete status. In the plugin Go to block, you can filter the redirection upon a user attribute value. Let’s filter on the value of isComplete. If it is false, we will go to Ask a question. Add a new step Go to block and filter isComplete when it is true to go to the block Show the result. Move this last step just after the JSON API step so it won’t try to display a question if the test is complete.
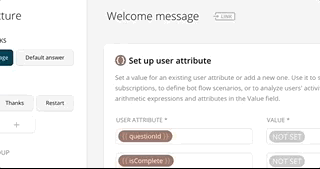
Let’s also add a persistent action to restart the test. In Chatfuel, create a new block called Restart and select the plugin Set up user attribute. Clear the value of questionId and isComplete (set them to NOT SET). Then, Add a new Go to block to the block Welcome message. Finally, go to the panel Configure and add a new action Restart, please. in the persistent menu that calls the Restart block.
You have finally a complete chat flow.

Conclusion
The first part of this tutorial has shown you how to set up Chatfuel and Firebase to create a dynamic chat experience for the end user. You can now create mockups to demonstrate your project. However, you didn’t use the persistence layer of Firebase yet to add some intelligence to your chat flow. In the part 2, we’ll store the user answers and compute its personality analysis.
comments powered by Disqus